Monday, May 22, 2017

on Leave a Comment

Cityscape Silhouette twin nails with @Nailsbynatalie_

Today I have a city-scape silhouette design that is a twin nails design with @nailsbynatalie_. You know I think this is actually the first ever twin nails I've actually done.  It was such a simple process. Natalie just DMed me in Instagram and asked if I wanted to do twin nails, and I was like 'yep, lets do it'. So anyone else out there that might like to do twin nails with me, just shoot me a DM!

For my sunset gradient I use Picture Polish mad magenta, coral reef and citrus.  I then stamped the black silhouette design on using the same plate that I used the other day for the butterfly wing design. Vivid Lacquer VL004.  I used different sections of the stamp on different parts of each nail so they all ended up looking different.  I like it a lot.


Saturday, May 20, 2017

on 2 comments

Digital Dozen - Rainforest - Day 5 - poison frogs

Day 5, yes I made it. I'm struggling to do 5 days in a row at the moment, how am I going to tackle the 31 Day Challenge in September? Perhaps I need to start doing manis now LOL!

Today I have a bunch of red poison arrow frogs.  I'm not really loving these. I wish I'd stamped the frogs in different colours, plus I was rushing and didn't get the alignment right on all of them! C'est la vie!

I really do love the little frogs though, which are from the Clear Jelly Stamper On the pond plate. The double layered stamping really highlights the frogs nicely.


Friday, May 19, 2017

on 2 comments

Digital Dozen - Rainforest week - Day 4 - Morpho Butterfly

A date late, but I'm here with day 4 of the rain forest inspired manis.  I needed a quick design that didn't need too much thought, so when I did a google image search for 'Rainforest Creatures' and saw photos popping up of the Morpho Butterfly, I knew I could pull it off in about an hour for the full mani.

I started with a gradient of Picture Polish blue, swagger and instinct.  I then planned to stamp over it with Vivid Lacquer plate VL004.  But my problem was that I had done my diagonal gradient the wrong direction for the butterfly wing design.  That meant I had to work out a quick way to mirror the image.  I knew I could do it with a stamping decal, but I didn't have time to apply 10 stamping decals, it would have been quicker to just redo the gradient on the other angle. 

What I ended up doing was pick up the image in the normal way, then quickly stamp it onto another clear stamper which reversed the image, and then stamped it onto my nail. I think I might actually do a video about it, because it worked out really well.


Wednesday, May 17, 2017

on 2 comments

Digital Dozen - Rainforest week - Day 3

I invented a new word today.  Pisanky.  You know in the movie Mean Girls how she makes up the word Grool, when she went to say 'great' but then changed it to 'cool'. I did the same today when talking to my mum about how pissed off and cranky I was that I forgot to photograph one of my rainforest manis, thus my merge of pissed off and cranky became pisanky. You can use that. Your Welcome.

Anyway, just to reiterate, I'm pretty pisanky at myself for forgetting to take those photos, especially as my already busy life became even busier yesterday.  I forgot I had a catch up scheduled with some friends after work, so didn't get home until about 9.30.  I then hurriedly did this mani and then stayed up till after midnight doing some testing for work, because we had to patch a bunch of servers against that crazy ransom ware virus.  I was the woken up at 5.30am with a call from work asking me to do some more testing.  So with out about 5 hours sleep I'm feeling pretty stuffed tonight. I usually get between 8-9 hours sleep a night, and I need that so I don't behave in a pisanky manner. So I'm telling you now, I'm gonna be a day late with my next two manis cause I'm off to bed after I hit publish.

For today's rain forest mani I have some pretty stamped hibiscus flowers over a silver holo base (Chanel Holographic no less - that's another blog post I promise).  I did the silver holo base to give the effect of rain forest mist. 

Thanks for stopping by.


Tuesday, May 16, 2017

on 1 comment

Digital Dozen - Rainforest week - Day 2

Why is it that Digital Dozen week always falls on the busiest week of the month?

Usually I work from home on Wednesdays for half a day, and I'm able to sometimes sneak in a quick afternoon nail painting session when I'm behind for a nail art challenge.  But this week I'm giving a presentation in the office on Wednesday and I swapped my half day for a day last week.  Of course I wasn't behind in my manis' last week because I thought I'd already completed one, but yeah, I didn't photograph it.  Plus I've just started doing a physio therapy rehabilitation 8 week program this week for my foot, and it really is painful and tiring. Come on lady, suck it up!

Today is day 2, and it's another green look. I really want to try diversify the colours this week, but I have a feeling it's going to be a very green week.  I really love the design today, it worked out exactly has I had planned.

Today's mani features a Bengal tiger stalking it's prey in an Asian Rainforest.  I started with a gradient blue and green background, then stamped bamboo stalks and leaves in different shades of green.

I created the tiger as a stamping decal using Moyou London Suki 02 plate.

I have created a similar design two years ago, but I think this one is way better.


Monday, May 15, 2017

on 3 comments

Digital Dozen - Rainforest week - Day 1

Argh, I'm so cranky at myself. I had done another mani for day 1 of Digital Dozen today, but it turns out that I totally forgot to photograph it!  I was downloading my photos from my camera and sorting through them and couldn't understand where they went. I seriously can't believe that I didn't photograph them. On the up side, there were definitely improvements that I could have done, so at least when I redo them later this week I will hopefully do a better job!

Ok, now onto the story of today's rain forest design.  I originally did all my nails the same, with stamping decals of these different shades of green leaves.  Just after I had finished all my nails (and stupidly before I took photos), my daughter asked me to help her find a piece of lego that had flicked across the room and went behind the TV cabinet.  

Of course I found the piece of lego, but in the process I managed to completely ruin my pinky nail.  I had just packed everything up and there was no way I was going to create another decal just for one finger, so instead I just painted random green bits on it and tried to disguise it with some sort of centipede going across my nail.  But it looked a bit funny just going across one nail, so I added a bit more onto the ring finger.  

Looking at it now, and knowing how long the damn stamping decals took, I wish I'd just done the quick random green smoosh on all my nails and got a hour or two of my life back! Argh! 


Saturday, May 13, 2017

on 1 comment

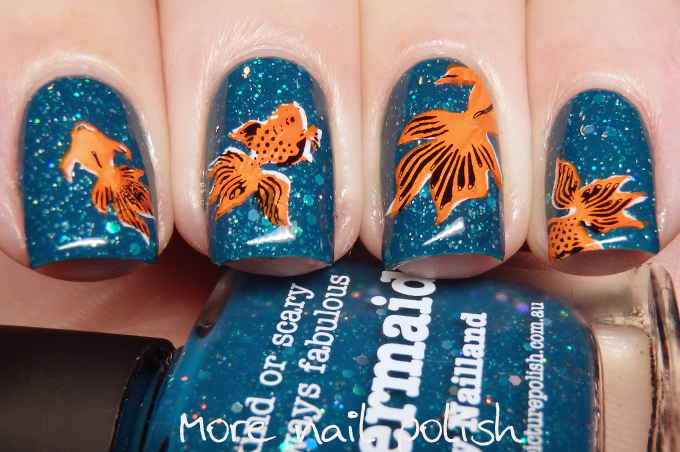
Mermaid and Clear Jelly Stamper goldfish

Today I have some cute little goldfish on my nails which were achieved so easily using the Crystal Stamper from Clear Jelly Stamper and their 'On the pond' stamping plate.

The base I chose for this was a new polish from Picture Polish called mermaid, which is a teal jelly with a mix of different sized silver holo glitters.

I stamped each fishy in three goes, first in white and then in orange, because my orange polish just didn't pop enough over the teal base colour without the white base. I then stamped the fish details in black.


Here is the CJS Crystal stamper.  It's pretty huge and it has a cover that goes over each end to stop dirt and fluff getting over the crystal clear stamping head.


I actually have grown quite a collection of clear stampers over the years, and here are the best of them.  Clockwise from the blue one they are - Big Blue stamper from Born Pretty, Big clear stamper from DRK Nails, CJS crystal stamper, Born Pretty and Picture Polish.

A quick option on them all.  Big blue, fantastic, love how it picks up images, but the solid holder takes away a lot of the light so looking through it can be quite dark.  DRK, has frosted clear side so the ligh is better, and it picks up images nicely, but it is rather thick so you can get a little image distortion looking through it.  CJS crystal, crystal clear on the sides and somewhat shorter than the others. It lets all the light in and the stamper is thinner so the image isn't distorted at all. I just a had few problems getting a perfect pick up every time.  Born Pretty store smaller clear, no complaints, frosted sides and a longer shaft means you can get a fish eye effect. Picture Polish stamper. Was my go to stamper for just about everything. Clear on the sides for nice light, picks up well every time, just the longer handle can give the fish eye distortion.


Here is a quick stamper comparison of all the stampers.  As you can see they all do a good job and you would generally be very happy with any of these.


Ok now back to a few more pictures of the fishes.


And you wont believe this, I filmed it.  Not just that, I edited it and already uploaded it to Youtube so I could embed it here in my blog.


I received this stamping plate and stmaper from Mega Nail Supplies, who are the Australian suppliers for Clear Jelly Stamper.  My voucher for 15% off , which is valid for her entire range, include all the Clear Jelly Stamper products is - 15MORE

Thanks for stopping by

Products provided for consideration.

Friday, May 12, 2017

on 1 comment

It's double Jelly time - Jelly gradient with Clear Jelly Stamper Tribal stamping

Remember when I said I did a mani and I wore it all week.  This is that mani!  It was so pretty and looked amazing for the whole time, including being chip free.  I attribute that to the white glitter base, that stuff really sticks like you know what to a blanket.

I started with the white Glitter Base polish from Dance Legend, and then I rubbed the silver holo glitter into it that I got from Mega Nail Supplies and showed a few days ago on my blog.

On top of that I added a gradient using three Dance Legend Enamel Glass polishes (1051, 1059 and 1060). The Enamel Glass polishes are really pigmented, but still very jelly like so the holo glitter base beneath really shone through.

The tribal stamping on top was made using the CJS Tribal stamp, which has lots of different individual elements that can be added together to form lots of different tribal designs.  I loved being able to determine what exact elements I was going to build my tribal design with, but the down side is that it does take a long time to finish a full mani.  That's because you are stamping each nail multiple times, in this mani, it was 5 stamps per nail which did add up the minutes.


One of my most favourite macros ever (even if it does still have a few of those little spider leg lines along some edges)


And here is a bonus shot of just the gradient before the stamping was applied. Pretty damn spectacular in its own right.


I received this stamping plate from Mega Nail Supplies, who are the Australian suppliers for Clear Jelly Stamper.  My voucher for 15% off , which is valid for her entire range, include all the Clear Jelly Stamper products is - 15MORE

Products provided for consideration.

Wednesday, May 10, 2017

on Leave a Comment

Pebble stamping over glitter with Clear Jelly Stamper

Look at me with two posts in two days.  I'm so awesome!

Today I have the first of the two nail art looks I promised over the glitter bases I showed yesterday. This one is pretty cool, but tomorrow's is spectacular.  

I decided to stamp in black and white over the pink glitter, it sure was a crazy look.  The images I used are of Clear Jelly Stamper Plate 'On the pond' and when you line up the two images, they fit together like a perfect jigsaw.  I can see me using these two images quite a bit with a bunch of different colours.


I was very happy with the quality of the plate. I've used the smaller Clear Jelly Stamper plates in the past and have had issues with them not being etched deep enough (which they did replace with new plates). These ones are nicely etched and the layered stamping designs line up perfectly.


I received this stamping plate from Mega Nail Supplies, who are the Australian suppliers for Clear Jelly Stamper.  My voucher for 15% off , which is valid for her entire range, include all the Clear Jelly Stamper products is - 15MORE

Tuesday, May 9, 2017

on Leave a Comment

Rub in those glitters feat. glitter from MegaNailSupplies

Not so long ago I got an email from Megan from MegaNailSupplies, a Facebook based store that sells a bunch of different nail art stuff here in Australia and who is also the official Australian stockist of Clear Jelly Stamper stamping plates, polishes and stampers.

I've been working on some manis using the CJS plates I received, but I'm still editing those, so in the mean time, why don't I share with you some of the glitter mixes. I wore all these mixes rubbed into various base colours, two of them into Dance Legend Black Glitter Base, one into the white glitter base, and another just into regular polish and top coat.

First up are two glitter mixes from the Black Galaxy Set.  This first one is called Gravity and it has an overall dark navy blue tone, but it twinkles with a rainbow of a thousand stars.


This next one, also from the Black Galaxy Set, called Berry Galaxy has a dark berry pink tone, but again a holo rainbow reflecting lots of different colours.  I ended up playing around with some stamping on with with some inglot flakies. The colour contrast wasn't strong enough for it to show up, so I'm going to have to stamp this again onto a lighter background, cause it looked amazing.

Both these glitters are quite small, I'm not really sure on my glitter sizes, but I'd say these ones are about .004" size, which is quite powdery and very easy to rub into polish and get a smooth finish.


The next two glitters are from the Disco Ballers Set and the glitters in these ones are a slightly larger at about .008" in size.  They still rub into nail polish very easily and you get good coverage with minimal gaps.

This pink one, which I rubbed into a coat of Essence Gel look top coat, over Ulta3 Eighties Fuchsia, is called Night of Pink and it is clearly a bright pink holo glitter.


Finally, this one is called Angel Wings, and would you believe it's actually a silver holo?  Here on my nails over white, it looks like multicoloured glitter, but that is actaully the holo colours on the silver coming out. Pretty cool hey! You can see the macro to see that is truly is silver.


These are just two of the glitters available in each set, The Black Galaxy set has 8 colours, and the Disco baller set has 12 colours.  I could go completely insane playing with all those glitters!  Megan tells me that all the glitters are also solvent safe, which means you can use them in frankening or mixing up you own polishes.

I have two nail art looks coming based which I did over Night of Pink and Angel Wings, and one of them I wore on my nails for an entire week I loved it that much.

If you want to see the rest of the range, or what else Megan has on offer, check out her Facebook shop - Mega Nail Supplies.  I also have a 15% off voucher, which is valid for her entire range, include all the Clear Jelly Stamper products, for any of my readers - 15MORE

Glitters provided for consideration.

About Me

My photo
I live in Canberra, Australia with my husband, Mr Ten and Miss Eight. My blog is all about nail polish, and a few other bits in between. You can contact me at morenailpolish@iinet.net.au