Monday, February 29, 2016

on 2 comments

Bow Nail Polish - NeoNation Collection

Have you heard about Bow Nail Polish?  It's a newer brand out of Russia created by the creative director of Dance Legend polishes.  The polishes are not part of the Dance Legend line, but rather a separate brand in 11ml rectangle bottles.  On launch last year, the brand released three collections of six polishes, NeoNation was one of those collections.

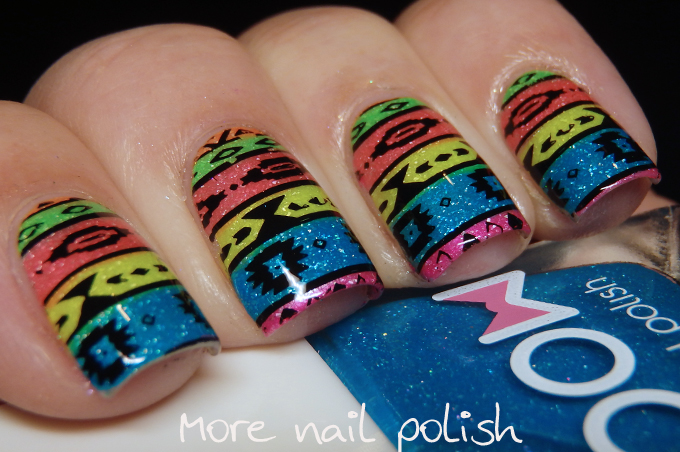
The polishes in the NeoNation collection are all neon jellys with a scattered holo flakes and a complementary shimmer.  On their own you need three coats to get full coverage, and with three coats they have a lovely depth of colour.  Being neons they also dry to a matte or semi matte finish, so you will need a shiny topcoat to bring out the best in the holo shimmer.  

I wore all these polishes together in the neon tribal pattern, created by using the advanced stamping technique on clear jelly stampers.


Let's look at each of the shades a little closer.  My photos are taken under a desk lamp, as unfortunately I've been working too much and haven't been able to swatch during normal daylight hours. All the polishes are a little brighter in real life compared to my photos.

Breathe Life - Bright lime green jelly with a golden shimmer.


Doll Everyone - Neon pink jelly with scattered holo and a golden shimmer.


First Light - neon yellow jelly with scattered holo and golden shimmer.


Means a lot to you - Coral jelly with a scattered holo and pinky shimmer.


Orangina - neon orange jelly with a golden pink shimmer and scattered holo


Feet in the ocean - neon blue jelly with scattered holo flakes and a blue shimmer.


The formula on all these was consistant. Thin and quite sheer to start with, but buildable at three coats for full coverage.


Here are all the Dance Legend links for your shopping enabling and social engagement.

Dance Legend Online Shop
Dance Legend Facebook
Dance Legend Instagram

Polishes provided for consideration.

Saturday, February 27, 2016

on 3 comments

40 Great Nail Art Ideas: Fashion

The theme for this week's 40 great nail art ideas is Fashion.  I quite like this prompt because it's pretty easy to get inspiration from fashion I think.  Generally when I browsing on my ipad, if I see something someone is wearing, or a picture of a dress or shoes or something that inspires me to do nail art, then I quickly take a screen shot of it.  I now have this huge library of ideas to select from when a prompt like this comes up.  

I found this picture of a pair of shoes on the @shoes account on instagram.  Unfortunately they don't credit the makers of the shoes very well on that account so I don't even know the brand of these. But I do know they have amazing iridescent multichrome straps!

I tried to find a matching iridescent green to blue polish in my collection, but I couldn't find anything that was a perfect match.  I ended up going with ILNP Cold Fusion.  I painted squares of the blue polish (Ulta3 Blue Marlin) and Cold Fusion onto my UberChic Mat and let them dry.  I then cut up strips and applied them over a nude jelly base.  The gold chains on my nails are gold temporary tattoos.


Wednesday, February 24, 2016

on Leave a Comment

Colouring in - on my nails with sharpies

Anyone else here like colouring in?  I really enjoy doing it and so do both my kids. My problem is that I rarely have the time just to colour.  My spare time is always spend blogging or doing my nails. So why not combine those two hobbies and do colouring in on my nails.

That's exactly what I did for this mani.  I started with a white base and then stamped the design with black polish.  I then grabbed a rainbow set of Sharpie pens and just started colouring.  So simple and easy to do, plus fun and relaxing too.


Monday, February 22, 2016

on 15 comments

Born Pretty Store Mirror Nail Polish

I'd seen this new Born Pretty Store Mirror nail polish on a few blogs over the last month or two, so with my latest set of products to try from the Born Pretty Store, I asked for a bottle.  Let me tell you that we have a new leader in the chrome polish stakes, but it's not all bling and shiny awesomeness, so read on for all the details about this very reflective polish.

The polish comes as as a two piece set. The mirror polish and what is labelled as a top coat.  From reading those previous blog posts about this polish I knew that the top coat is not really a top coat to apply over the polish.  Let's just call it a top coat to apply to the top of your nails to get a smoother finish.  Or in other words, an aqua base and it takes bloody ages to dry - like 15 minutes

Once it is dry you can apply the metallic mirror polish.  Make sure you shake the bottle really well, otherwise you wont get any metallic pigment on your nails.  Plus when you look at the brush you wont think you have anything on it, because the consistency is really watery.

Now this stuff is weird, and totally unlike any other polish I have applied.  Now the other bloggers said this too, but until I tried it I wasn't able to imagine what it was like.  Other chrome/mirror polishes dry very fast, and many of them look kind of dull and then as they dry - bam - reflection.  But this dries instantly.  Like by the time your brush is at the end of you finger the base of your nail has dried.  I even filmed applying two layers of this and will upload the video to instagram, so make sure you jump over and check it out to see what I mean.

As with other chrome and mirror polishes, you will see every single flaw in your nails. I'm lucky that I don't have peeling nails, otherwise these polishes show that up so badly.  I do have scratches across my nails, because I sometimes like to buff away some of the yellow staining (and get lazy with the fine buffing). As long as I'm gentle, I keep my nails strong and a little whiter. Christine over at Serenity nails got an amazing finish wearing the mirror polish over a gel base, so make sure you check her swatches out.

Let's look at this polish on it's own first.  This is two immediate coats per finger with no top coat.


Yeah, it's pretty damn awesome. No some comparisons with other true chrome polishes.

OPI Push & Shove on my index finger, Born Pretty Mirror on my middle finger, Sally Hansen Sterling Silver from their Color Foils collection on my ring and Layla Metal Chrome from their Mirror Collection.

The Born Pretty Mirror polish is a darker shade of silver, more like the Layla Metal Chrome polish. Check out my previous comparison of chrome polishes when I swatched the Sally Hansen Color Foils.  The Born Pretty polish is also the most chrome and mirror like of these polishes.  Each of these is two coats with no top coat.

But, and there is a big but...


It just doesn't last!  Here is a quick photo taken of the same four nails just 8 hours later.  The Born Pretty Mirror polish wears off badly.  Now I'm sure that applying top coat would make it last much longer, or even a mirror sandwich, where you go aqua base, mirror polish, mirror polish, top coat, mirror polish.  I haven't tried that yet, but its on my list to do to see if a) it lasts better and b) if it still has the awesome chromey appearance.

The wear on this also begs the question, what the hell is this? and where is that metallic pigment going?  Did I eat some? Was is just washed down the sink?  Hmmmm, preparing food and eating with your fingers are probably both things I would avoid with this polish on.


So yeah, while this is the most mirror like polish I now own, it really is for a special occasion.  A night out would be fine, and at least it doesn't chip.

Polish provided for consideration.

Friday, February 19, 2016

on 2 comments

The Digit-al Dozen does 'Nail Heroes': UberChic Mat and 40 Great nail art ideas Red Roses

How fast did this week go?  I can't believe it's Friday evening already.  A big week on my blog with five full days of posting. I don't know how I ever managed to post every day for more than a year two years ago!  I guess my kids were younger and did more stuff around the house rather than organised activities on the weekends that now takes up the time that I previously spent playing with polish.

Anyhow, lets get into tonight's mani.  I have two challenges going on tonight.  Firstly the last day the Digit-al Dozen Nail Heroes week, as well as a colour and pattern prompt for the 40 great nail art ideas challenge.

For the Digital Dozen Nail Hero I'm celebrating my UberChic Mat.  For 40 great nail art ideas my prompts were Red and Roses.  Can you believe that of all the pattern prompts I ended up with Roses on the Red day the week after Valentines! I actually wore these nails on Valentines day last Sunday.

Firstly, let me rave about my UberChic mat.  Ok, there are lots of silcone mats available now, Messy Mansion, DRK, Bundle Monster and Simply Neat Miracle Mat to mention a few.  The reason I have the UberChic mat is because it was the first on the market and I had to have one immediately.  And then once you have one, you don't really need another so I just stuck with the first one I got. Although I do like the look of the Miracle Mat with it's raised circles and edge.

I use my UberChic mat every time I paint my nails.  Even if I'm not not doing nail art, it's beneath my hand protecting my table from polish and acetone.  I love using it to mixed polishes together to get a custom shade, whether it be for stamping for for nail art it makes a great palette.  I also love using it under my stamping to collect all the wiped off mess.  Plus of course I use it all the time for making decals.  No more plastic baggies that wrinkle up.  So YAY for my UberChic mat - you are a hero.

Now lets talk about the red roses I did here.  My base polish is Cupcake Polish Elizabeth.  The rose decals are coloured in with Emily de Molly Understatement.


And a follow up rave about the Picture Polish clear stamper. I'm very happy with it.


I also have two link ups to add to this page, but it looks like two link-ups done play nicely together, so to see the Digital Dozen link up you will need to click through.

An InLinkz Link-up

Oh, and I'm so behind in posting to instagram that I haven't even posted the video from yesterday's mani, so rather than waiting for me to upload it to instagram, I've uploaded this one to youtube.


Thursday, February 18, 2016

on 5 comments

The Digit-al Dozen does 'Nail Heroes': Sveta Sanders

There are so many amazing nail artists out there that I could have done a Nail Hero post one.  I'm talking the big guns of nail art blogging that have been around for many years, like Chalkboard Nails, The Nailasaurus, Chit Chat Nails, Oh My Gosh Polish, Piggy Luv, Lacquerstyle, Manicurator to mention just a few off the top of my head. 

But the hero I've chosen today is one that constantly makes me say WOW, and why didn't I think of that, or WOW, and how the hell did she do that!  I'm talking about the incomparable Sveta Sanders or @sveta_sanders.

One of the nail designs that Sveta never ceases to amaze me with is her drag marbles - they are flawless and she is always coming up with new designs.  About five months ago she created a beige coloured flower drag marble and I've keep it stored in my memory bank until now.  In fact I actually did try to recreate this design when I had the drag marble prompt in the 52 week challenge.  That time I tried painting it directly on my nail like Sveta did in her tutorial, but it was a total fail.  This time around I did the drag marbling on my UberChic mat and then applied the designs like decals.  

Better than my first attempt, but still a far, far cry from Sveta's design.  Sveta I bow to you, you supreme goddess nail art hero!


My video on these will be added just a soon as I've edited it.

Wednesday, February 17, 2016

on 5 comments

The Digit-al Dozen does 'Nail Heroes': Latex and other nail barriers

Welcome to Day 3 of the Digit-al Dozen Nail Heros week. Today I'm featuring another product that has pretty much become an absolute must have for nail artists.  Liquid latex nail barrier.  Oh man, do I remember the time before latex barriers!  It was basically sticky tape central where you would use tape all around your fingers to protect them when doing water marbles or gradients. It was awkward, slow and messy!

Not any more, plus there are so many versions on the market that you are bound to find something easy to buy for you.

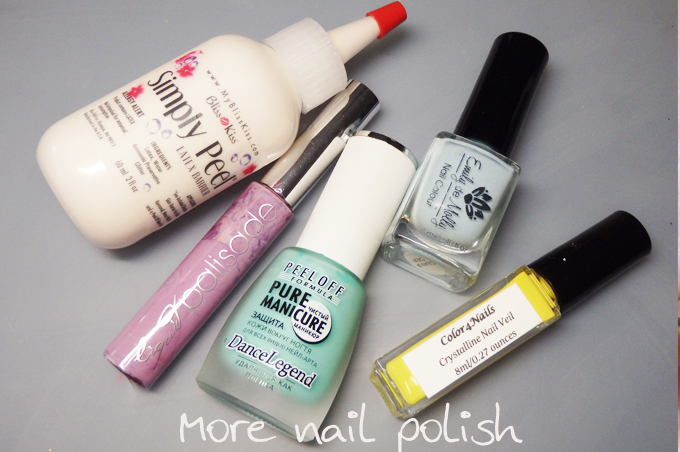
I have tried five different latex barriers and I'm going to share my thoughts about each one. They are:
  • Simply Peel
  • Liquid Palisade
  • Dance Legend Pure Manicure
  • Emily de Molly clean up crew
  • Color4Nails Crystalline Nail Veil


Here are the brushes that I have for the various products, from left to right, Liquid Palisade, Nail Veil, Pure Manicure, Clean up crew.  I haven't included Simply Peel here because I only bought the refill bottle, and I have poured it into my own empty polish bottle.

I understand that you can now get Liquid Palisade in a wide brush now too.

Now from my perspective, having latex barriers with both thin and wide brushes is awesome.  I use the fine brushes for masking out details on my nails and then peeling them off, whereas I use the larger brushes to paint around my cuticles quickly before doing messy nail art. Sure, using a thin brush to paint around your cuticles is a pain, and you aint going to be able to do fine details with a large brush.


Colours, yes lets talk colours.  I personally like my latex to at least have a tint to it when it's dry so it makes it easier for me to see the edge of it to peel it off with tweezers.  What that colour is I really don't care. Simply Peel is basically transparent when dry with the iridescent glitter in it, so while it doesn't dry with a colour, when it's dry you can see the glitter sparkle and that helps define the edge.


As far as these products go, they are all awesome. They all peel really well and don't leave any gross bits breaking off.  My personal preference at the moment would be either the Dance Legend Pure Manicure or Simply Peel, because they are both nice and thin and very easy to apply.  The other three products are much thicker to apply. But to be fair, the other three products are much older, like more than a year older than the other two, so that's probably why they are thicker now.

Dry time? Again, these are all pretty similar, although the two thinner products did dry faster simply because I was able to apply a thinner layer of latex.


Is there a down side to latex barriers.  For me, no, but for someone allergic to latex then that's a massive problem. That's where vinyl nail aprons come in.  I received these aprons from Loki's Nail Vinyls. Below I've photographed the dark grey larger ones I had, whereas I wore the white smaller aprons (it's just the grey was easier to photograph than the white).


Nail aprons are applied to the nail in two pieces and they neatly fit around the cuticle line of your nail protecting your skin.  I little bit also wraps around under the tip of your nail. They are quick to apply and quick to remove.


And the gradient mess.


Removed.  Nail aprons are also reusable, just stick them back onto the paper they were on and let them dry until next time. You'll get between 5-10 manis out of each set from my experience, or you could use one apron for all ten fingers.


Finally, here is the mani I did with that gradient.  An African savannah silhouette .


And just to reiternate yesterday's Nail Hero, all my stamping was done with a clear stamper.


There are lots of other latex barriers out there, and many simply buy they latex products in bulk (in the USA it's known as hair glue) and use that.

What nail barrier product do you use, and do you like it?

Some latex barriers and nail aprons provided for consideration.

Tuesday, February 16, 2016

on 17 comments

The Digit-al Dozen does 'Nail Heroes': Clear Stampers - with review and where to buy

The Nail Hero that I have selected for today is Clear Stampers.  Seriously these are awesome.  If you are a nail stamper and you don't have a clear stamper then you have no idea how much they can change your life. Here are some of the things I can now do because of clear stampers:
  • accurately place individual stamps on my nail.
  • stamping straight lines.
  • stamping any design straight that needs to be straight.
  • creating layered images using layered plates.


Over the last few months I bought quite a few different clear stampers and received some for review, so I thought I would take this opportunity to share some info about them all to help you decide which is the right one for you.

The clear stampers that I have in my collection are:
  • Original Clear Jelly Stamper
  • Messy Mansion crystal stamper
  • Born Pretty Pink holder clear stamper
  • Born Pretty white holder clear stamper
  • Ali Express clear stamper
  • Picture Polish clear stamper
For comparison purposes of each of the heads, I've compared them to the squishiness of my Messy Mansion Pro Stamper set, as I have the best comparison photos of squishiness for those stampers. You can check out that post here.


Lets start with the first clear stamper that I got.  The Original Clear Jelly stamper.  This is the one with the firm head, and they do now sell a softer head, but I can't comment about how that softer head compares.  The harder head is quite firm.  I would rate it a little bit harder than the purple Messy Mansion pro head, but softer than the blue one.  With a good quality, deeply etched plate, the image picks up nicely.  This is a Born Pretty Plate and it works ok. Shallow plates like the CJS layered plates are difficult to get to work with this stamper.


Stamper number two is the crystal stamper from Messy Mansion.  This came in the same frosted white holder as other stampers, but I changed the holder to his much shorter one to better see through it.

A couple of things. My new holder is slightly narrower than the original holder, so now my stamping head has shrunk to that size and  falls out of the original holder. Not that that is a problem for me.

Second thing, I took this stamper to work one day when I was doing a stamping session with some of the ladies in the office during lunch. During transportation, it came out of it's holder and the back of it got suck to another stamper. As a result of peeling them apart I got some tears and markings on the bottom now, which means it's no longer crystal clear, you can see this in the bottom right photo. This is no fault of the stamper, it's mine, but I wanted to share that these are delicate and you don't want to let stamping heads touch each other.

As far as squishiness, this one is definitely the squishiest of all the clear stampers. I would say it is comparable to the Yellow Mession Mansion pro head. It picks up images really well.


Ali Express -  this one came it the same frosted white holder.  My stamper arrived with marks on the bottom that look like greasy finger prints. I've not been able to remove these marks or scratches, I've tried sticky tape and washing it was dish washing soap.  This is a bit disappointing as it means it's not crystal clear to look through.

In terms of squishiness, this would rate about the green in the Messy Mansion pro set. It picks up the image really nicely.


Born Pretty Store - I bought two stampers, one pink and one clear to see if there was any difference between the colours.  The answer to that is no, the heads are identical.  I prefer the frosted white holder as it lets in more light down the shaft of the holder.

These pick up images nicely and I'd rate them about a green+ on the Messy Mansion pro set scale. That is. they are a little harder than the Ali Express one that I rated as Green, but they are not as hard as the Original CJS.


My most recent acquisition is the Picture Polish Jelly Stamper.  I love this one.  It has a long totally clear holder that is fully enclosed that the back end, meaning no dirt or fluff (or cat hair) gets down the shaft and sticks to the head.  It also comes with a lid that protects that head of the stamper from same dirt, fluff and cat hair.  It also stamps perfectly, in fact I found it to stamp the best out of all the ones I have.

I would rate it a Green+ in terns of squishiness, the same as the Born Pretty heads.


Here is a comparison picture of all the stamping images.  I think you will be ok with pretty much any brand stamping head that you buy, cause they all worked well for me as along as you are using a good quality, deeply etched stamping plates (eg Moyou London, Messy Mansion, Emily de Molly, DRK, and many of the Born Pretty Plates).


Now it's mani time. Here is a mani I created using the actual Clear Jelly Stamper layered plates.  A tutorial video will be added here as soon as I have edited it for instagram.


Finally, I've pulled together a list of all the places I know that sell clear stampers.  I have not tried the stampers or purchased from all these etailers, and I provide these links without affiliates. I suggest you shop around to find the stamper you like at the price you like.

Picture Polish
Clear Stamper Kit - comes with a spare stamping head for the kit price.

Messy Mansion
Several options - frosted holder like mine above as well as a similar version to the Picture Polish clear stamper.

Born Pretty Store
Several options - pink, purple and frosted holders + refill heads sold separately.

Ali Express
Frosted white holder version

Clear Jelly Stamper
Several options. New stamping heads are advertised as soft compared to the original that I got above.

Girly Bits
Clear stamper. Looks like the same style as the Picture Polish one above.

Hit the Bottle
Frosted white holder version.

UberChic
Frosted white holder version

Purjoi
Frosted white holder version

Wildflowers nail Academy
Frosted white holder version

Nail Hoot
Frosted white holder and purple holder.


About Me

My photo
I live in Canberra, Australia with my husband, Mr Ten and Miss Eight. My blog is all about nail polish, and a few other bits in between. You can contact me at morenailpolish@iinet.net.au