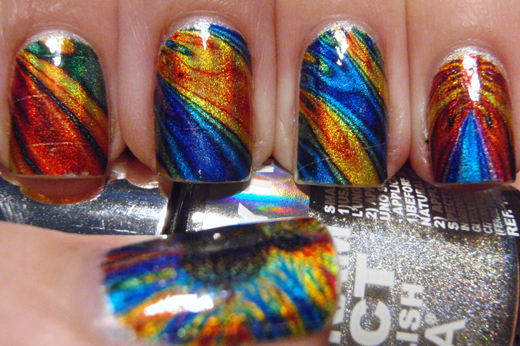
I'm stepping into uber geek territory here and showing a nail art design I made using temporary tattoo paper and a Mandelbrot set design.
What's a Mandelbrot set you ask? It's a distinctive and easily
recognizable two-dimensional fractal shape, named after the
mathematician Benoît Mandelbrot. Or as Wikipedia explains it "... the Mandelbrot set is the set of values of c in the complex plane for which the orbit of 0 under iteration of the complex quadratic polynomial zn+1 = zn2 + c remains bounded. That is, a complex number c is part of the Mandelbrot set if, when starting with z0 = 0 and applying the iteration repeatedly, the absolute value of zn remains bounded however large n
gets."
Still with me? Nah. Well don't worry I don't understand any of
that mathematical mumbo jumbo either, but I do know if you google image search
"Mandelbrot" you'll get a bunch of aesthetically beautiful designs that would work perfectly for
nail art temporary tattoos.
Here is the Mandelbrot design I printed onto the temporary tattoo paper. I cut sections for all my nails, and used a full mini design on each of my thumbs.
Image source: http://fractaljourney.blogspot.com.au/
Unfortunately there was no sun today, so I had to take these under the bathroom light. It was also after 24 hours of wear, so there are the starts of some tip wear where I forgot to wrap my tips.
Here is my right had to show the different designs and colours - and I still can't work out how to hold my hand with it feeling cacky handed!
The only thing that annoyed me with this mani are the little lines across the nail that look like hairs. They are in fact little gaps that my ink jet printer leaves when printing sometimes - grrrrr. It's only really noticeable in these photos and not no much in real life.
If you need more information about how I did these temporary tattoo nail art designs, then check out my tutorial. I have also grouped my other temporary tattoo nail art designs under one tag.
I hadn't done a temporary tattoo design for ages, and I'm really happy with how this one turned out.


WOW. NO WORDS! Probably one of the most beautiful nail art I've ever seen!
ReplyDeleteGorgeous! This is definitely one of the most beautiful manis I have ever seen! I love how the holo of the base polish shows through all those bright colors!
ReplyDeleteThat looks incredible amazing!
ReplyDeleteYeah, this is pretty fantabulous, but you knew that already. Now I'm going to have to look into buying a printer so that I can try this magic.
ReplyDeleteIt's psychedelic and hypnotizing. Very pretty! :)
ReplyDeleteSuper !!!!
ReplyDelete1. These are amazing
ReplyDelete2. You are not the only geek doing nail art, I promise!
3. **Must** see/hear:
http://youtu.be/ES-yKOYaXq0
I immediately thought of the JoCo song too! Gorgeous design :)
DeleteWow girl
ReplyDeleteSo impressive !
Geek nail art is the best nail art. ;) These look incredible. I bet you keep staring at your nails, lol!
ReplyDeletethis is unbelievably awesome, love it :-D
ReplyDeleteHoly crap, this is way too awesome.
ReplyDeleteFreakin amazing! Wish I had an inkjet printer so bad!
ReplyDeleteIf only I had the talent to do these :(
ReplyDeleteI absolutely adore them, you are amazingly talented w' the ideas you come up with. They really do look Fabulous - I want some now!!!!
This is incredible!! It's genius! Love it! ^_^
ReplyDeleteThis is gorgeous! What a great idea!
ReplyDeleteamazing! the geek in me is spell-bound :)
ReplyDeleteWow this is so colourful! I love it
ReplyDeleteYou lost me at math :P Either way that's beautiful!
ReplyDeleteFabulous. The possibilities with this method are endless.
ReplyDeletewow how fabulous
ReplyDeleteOh this looks awesome! Reminds me of water marbling, but awesomer!
ReplyDeleteWow! These look so cool. I can't stop looking at them!
ReplyDeletebeyond cool... great job!
ReplyDeleteMIND = BLOWN.
ReplyDeleteWow! It's incredible!
ReplyDeleteIs temporary tattoo paper the same as tracing paper?
ReplyDeleteNo, it's a unique product that comes as two sheets. You print on onw and stick the over the top to create the tattoo. I got mine off ebay.
Deleteawesome, just one question...how do you cut them to fit your nails so perfectly around the cuticle? Is it a "practice makes perfect" thing, or do you have any tricks or tips you can share?
ReplyDeleteOh yes, I do have a little trick. I have a set of stick on nails that I have saved for each nail as the perfect size. I then trace around the cuticle edge onto the tattoo. That gives me the perfect curve and size for each nail.
Delete